In this article, we will be learning how to draw eyes in a very easy-to-follow step-by-step manner.
so let’s start with our drawing, I want you to start with me so that you can learn it more efficiently, just by scrolling through the article you can’t reach anywhere near learning and growing, and at the end of the day you will gonna forget it,
let’s move on to our first part in how to draw eyes.
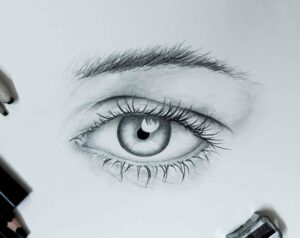
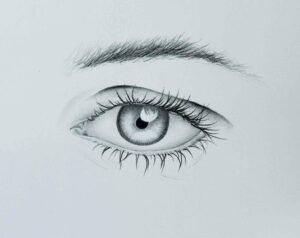
you can use my above image as a reference or you can get a photo reference from the internet
1. DRAWING BASIC STRUCTURE
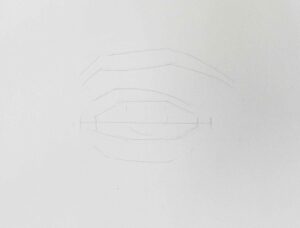
So this is our first layout, if you have seen my other articles, you know the drill we don’t jump directly to draw what we see, first we build a rough structure of what we are going to draw from the reference.
Now our base is ready so we can move to the next part.
2. OUTLINE OR CONTOUR DRAWING

so as you see I have drawn the outline of the eyes and erased the unnecessary part which we have drawn as a structure.
when you are drawing the outline you have to be little light on it so you can correct it with the eraser, if you go dark in the first go then it will be so hard to erase it and some of the lines can still be seen.
Don’t go for very dark and sharp outlines because we have to draw the realistic eye and real things don’t have pronounced outlines so only dark the lines where you want them to be.
spend some time on it to make the outline properly because if your outline is not good or if it’s not looking like a human eye then no matter how good your shading is the end drawing will not look good.
so take some time to use an eraser if you need and create some good outlines, take as much time as you want!
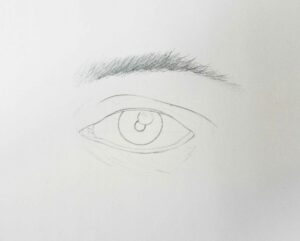
so when I got satisfied with the light outline, I made it a little darker and filled in the details,
you can see for eyebrows I have used sweep strokes overlapping each other to get the desired effect. you can try different types of strokes and can get good results with them.
3. ADDING CHARCOAL

Yes, you may be wondering why it got so dark in some parts, here we can see the magic of including charcoal pencils in our pencil drawings, just make sure your charcoal pencils are sharpened before to get these details, I have used soft charcoal pencil for this, you can use either.
Don’t use the charcoal pencil everywhere just where there is completely dark to give a contrast to our drawing.
if you have completed your outline like this we can move towards the shading part.
4. ADDING UP LAYERS
As you can see I have added some shade inside the iris with a softer pencil like 2B and leave the highlighted part without touching, it should be possibly white.

I have used the paper stumps and smoothen the shade and added some made shade with the 4B pencil to make it a little darker on the top of the iris.
Don’t worry if you got any graphite on the highlight you can easily remove it with a kneaded eraser, always use the kneaded eraser for the detailing part.
5. SHADING BASE LAYER

now I have added some shade in the eye and some of the above skin, I have used 4B but you have to be gentle, gradually you have to dark any area, don’t put too much pressure on the pencil.
after smoothing with paper stumps if you feel that the area needs to be darker then again shade on it and smooth it with paper stumps; that’s why I said to go light with minimum pressure so when you do work again on it the paper will not mess up.
Want to learn more about shading follow this tutorial: ”How To Shade”
6.SMOOTHING THE BASE LAYER
now you can notice that after smoothing it with the paper stumps the eye is started to come to life, if you have not used paper stumps before just try it on a different paper and then use it on the drawing,
my style of using the paper stumps is I try to make smaller circles with it and then move it around with different pressure according to want tone(light-medium-dark) I want in that particular area.
Don’t rush it to complete the drawing the more time you will give to your drawing the more it will become better, just try to focus on your reference image and try to discover details in it, and then try to implement it on your drawing.
7. ADDING MORE LAYERS TO SHADE

I have applied some more shade in it as per my reference image, you can easily see every pencil strokes and I am not being specific about the strokes because as we are going to use paper stumps anyways it will gonna smoothen out (but only if you have applied light pressure with the pencil, the paper stumps can’t smooth out hard pencil strokes.)
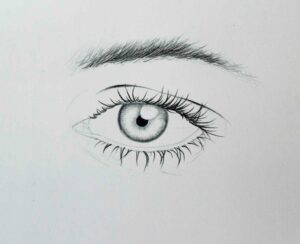
8. SHADING AND ADDING MORE DETAILS

So this is our last part for completing our drawing, I have smoothened out all the shades with paper stumps and re-shaded the areas I wanted to be darker.
I have also added some pencil lines and dots to give it a texture and real like feel .you can even add more texture to it to give it more feel,
For instance, if you have made this and want to learn more try taking a reference image on an old lady’s eye that will challenge you even more, if you want me to draw an eye of an old lady you can ask me in the comments I will definitely try to make an article on it.
if you tried this how to draw eyes tutorial then please comment down below, I will be glad to know what you guys learned:)
Very nice detailed tutorial learned a lot about shading!