In this tutorial, you will learn how to draw a dog easy step by step.
Let’s grab all the materials you need and start to draw with me following each easy step. By following along and drawing with me you can understand this tutorial even better.

Total Time Needed :
45
Minutes
Required Tools: Art Supplies
Check out the art supplies page to check out the materials which are used in making the drawing.
Let’s get started :
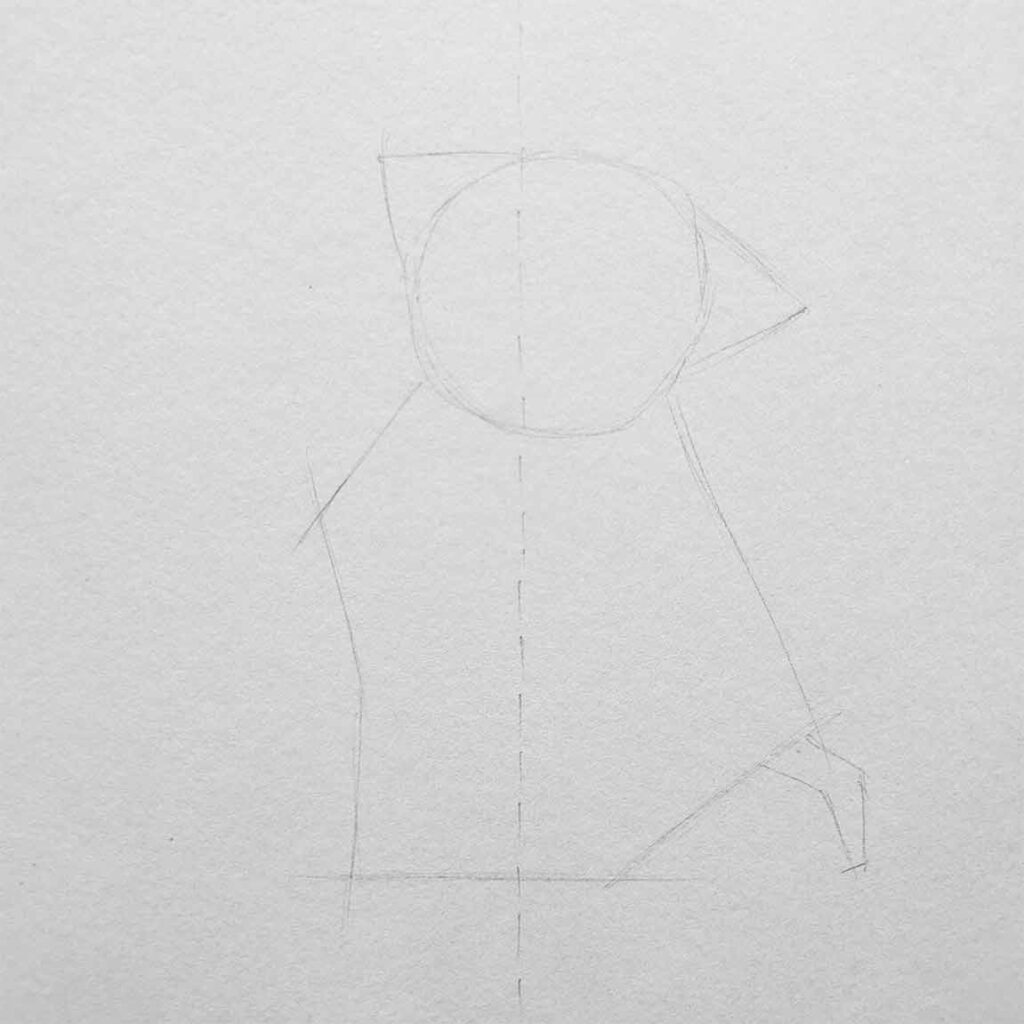
Drawing Basic Structure:
On how to draw a dog first, draw a basic structure of the dog.
You can use a mechanical pencil here to keep it light.
Draw a centerline to define the angle of the subject and then according to the dog’s position of sitting or standing, draw a rough structure to locate the position of the body and the head.
In this step try to define the proportions of the head and body properly, and as we have drawn just the structure it will be easy to look at the proportions if it is completely off. so on later steps, you don’t have to bother much about it.
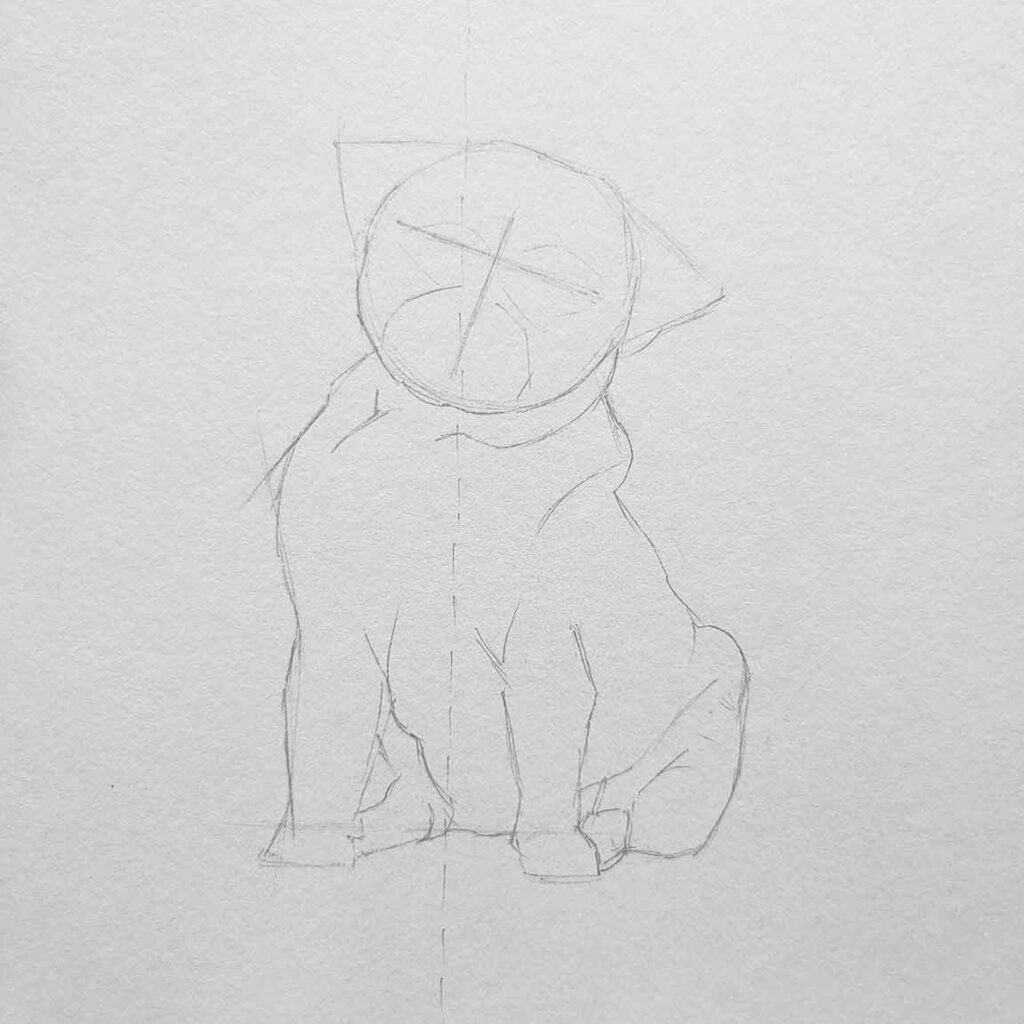
Define the shape:
After we have drawn the basic structure, start defining the shape.
Pay attention to how the dog is sitting and at which angle he is leaning.
Try to define the face, body, all four legs, Don’t give the details yet just pay attention to proportions and angles.
If you want to make sure if the proportions are right then go back from your drawing and look from a distance.
In every step, you can do this and it will improve your drawing skills by a large amount.
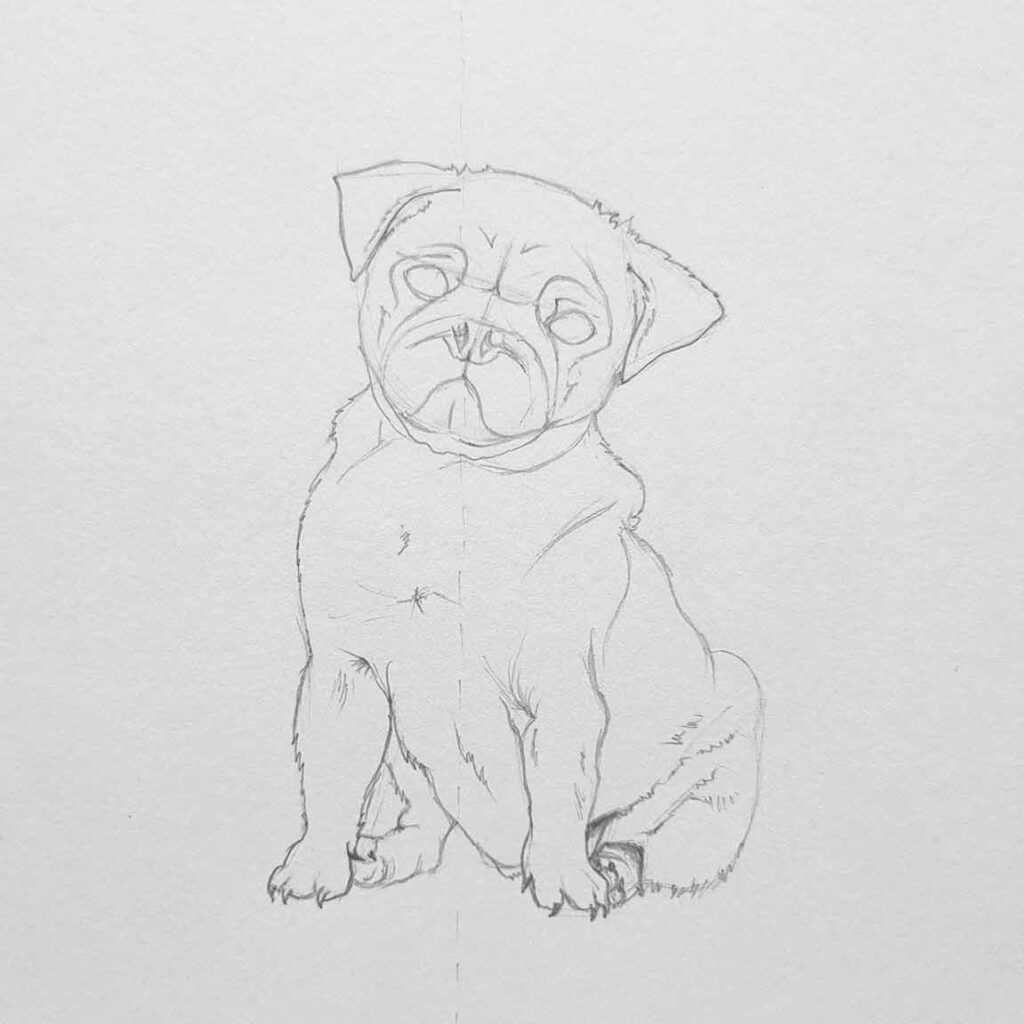
Outline or Contour Drawing
Now we can make an outline of the subject or the dog, As we have already defined the shape and proportions it will be easy for us to make an outline.
You can add the details now like the facial parts etc.
Don’t add the fur or texture in this step that we will do in later steps.
After drawing the complete outline if you feel the proportions don’t look good get them right on this step before moving forward to the shading.
This is the most important step of drawing don’t rush this step.
If the outline or contour drawing is not correct then it doesn’t matter how good the shading you can give, the drawing will still look bad.
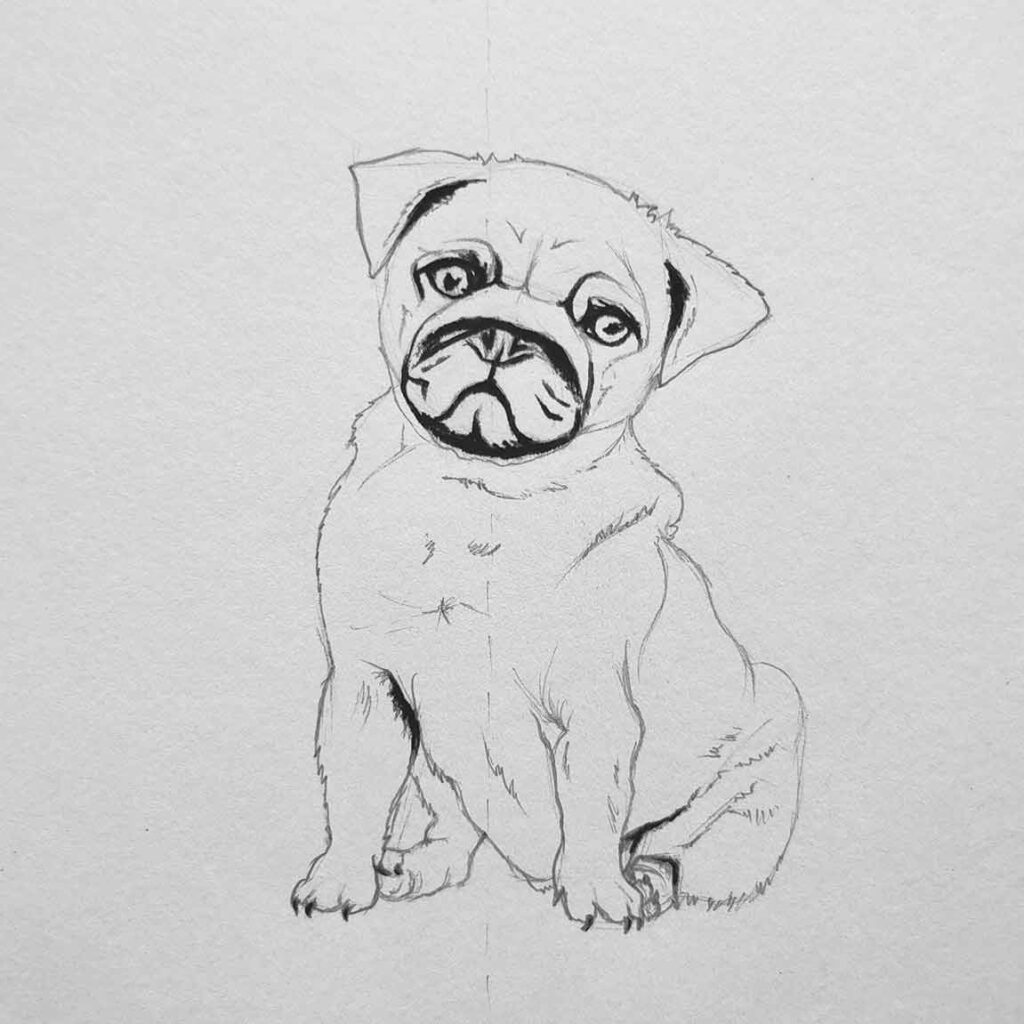
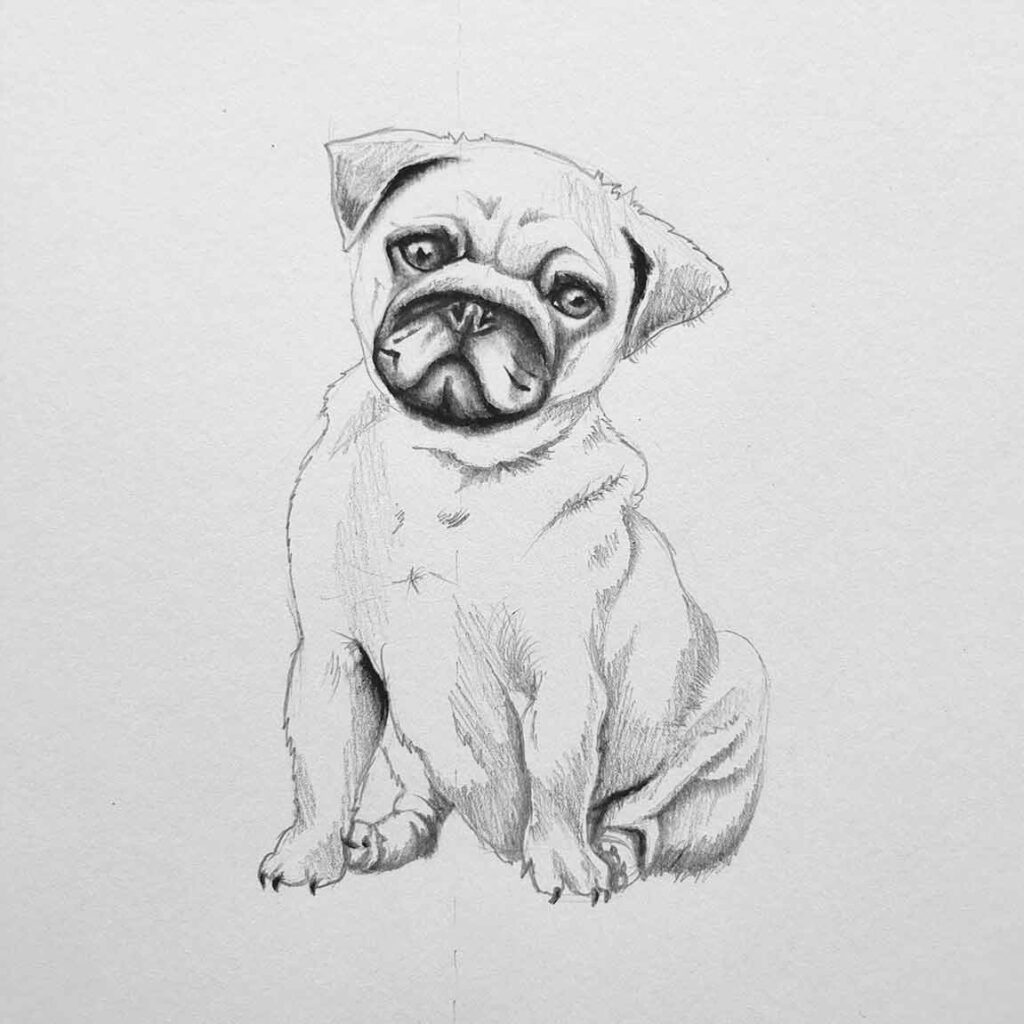
Adding Charcoal:
I guess you are ready with the outline of the dog and ready to move to the next step.
Let’s add some charcoal or darkest tone to the drawing.
I have used a soft charcoal pencil, you can also use 4B or 6B pencils but it will not come like this dark.
The best part about the charcoal pencil is that it doesn’t shine like graphite pencils.,
to achieve a darker shade if you fill the area with any graphite pencil it will reflect the light and shine and that’s annoying.
If you are using a charcoal pencil then just fill only the darkest area, all the other parts we will shade with graphite pencils to get lighter shades.

Blending Charcoal:
Let’s take out your paper stumps or if you don’t have one, grab cotton or tissue paper.
Just by looking at my drawing the blending, I have done may look overwhelming if you are just starting out in the drawing field. But don’t worry as you practice you will get better at blending.
While blending the area make circular movements with the paper stumps to achieve good results.
Leave all the middle and light tone areas and don’t blend upon them, I have left all the areas blank so I can come back on it later.
In this step, if you (by mistake) dark the highlight areas try to erase that part with the kneaded eraser or the normal eraser.
If that part is still dark, unfortunately, you have to start the drawing all over again, follow how to draw a dog again( don’t worry practice will only make you better).
Adding Up Layers
Now we will add the layers with our graphite drawing pencils,
You can use 2B pencils to get started, on later stages if you feel any parts want to look darker then you can use 4B pencils.
To add layers first determine the light-middle-dark area to know where to apply more pressure.
If you are drawing from an image then it will be easy to determine that, but if you are drawing from a live subject it will be hard and it will require close attention and practice.
So with the help of 2B pencils fill all the areas which are in shade or has a dark tone.
Blending Layers
Now grab your paper stumps again and blend all the areas with it following the tone of the reference image.
Try to leave the area which you feel has a light tone or highlights.
For the middle and dark tones, you can apply some more pencils and blend them again to the dark areas if you didn’t get the desired effect on the first go.
After blending with the paper stumps, take out your kneaded eraser and rub the areas where you feel there is a highlight.
You can do it according to your reference image or follow my drawing image.
Keep adding on layers until you feel satisfied with your drawing, don’t overdo it, it can make your whole drawing dark or blurry.

Adding Dog Fur or Texture
Now we will add some texture to our drawing to give it a more realistic and natural look.
This is the fun part, you don’t have to be perfect in this.
Just draw random lines straight and curves in groups to show it as the dog’s fur.
Draw darker lines on the shade areas and keep the strokes light on light tone areas, in this way you can keep it natural looking.
Some pencil strokes are coming out of the outline of the drawing like the fur is supposed to be, so draw it accordingly.
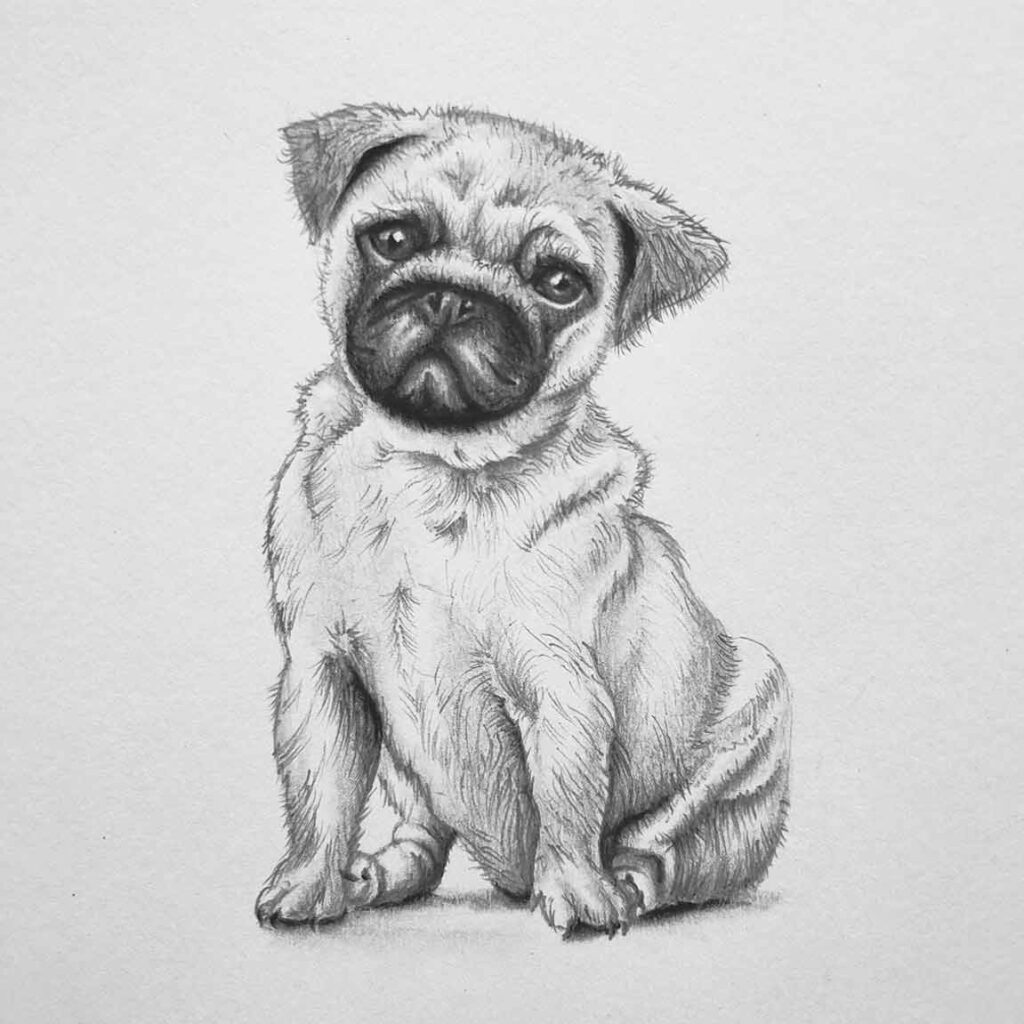
Adding Final Touches and Shadows
Now move away from your drawing and look it from far and try to see which area you need more attention on.
I have darkened some parts on the face according to my reference image.
and with the help of a kneaded eraser,
I made the highlight parts like under the eye more clear and neat.
On some darker areas, I made the fur strokes darker to give it more depth.
I have added cast shadow under the dog to make it look like he is sitting on something and not floating in the air.
You can give more time to the cast shadow to make it more interesting.
If you have tried this how to draw a dog drawing tutorial and followed this tutorial with me then let me know by commenting down below.
I hope you learned something from this tutorial, Have a great day:)